Isn’t it just fantastic how Elementor bundles up all the goodies we need in one neat package? It’s like a Swiss Army knife for your website – it has everything! One of my favourite tools in this all-in-one wonder is the form builder. No need for extra plugins, no fuss. It’s all there, ready and waiting for you. And the best part? The drag-and-drop editor is as easy as pie, even if you’re a total newbie. So, buckle up, my friends! I’m about to guide you through the super simple process of creating your very own form with Elementor.
Alright, my tech-savvy friends, I’m going to take a wild guess and assume that since you’re here, you’ve already got Elementor installed and ready to roll. If not, no worries! The internet is bursting with resources to help you get started, and one of the best places to start is at Elementor Academy itself, here: https://elementor.com/academy/
Creating your First Form with Elementor:
But for now, let’s skip the small talk and dive right into the action. We’re going to kick things off by choosing the page we want to work on and hitting that ‘Edit with Elementor’ button. Ready to rock and roll? Let’s do this!

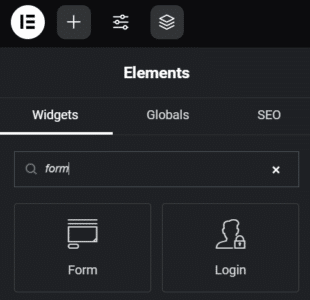
If you’re using the latest version of Elementor (and why wouldn’t you be?), you’ll find the ‘Add Widget’ button at the top left of your screen, looking like a plus symbol. If you’re using an older version, your ‘Add Widget’ button will be at the bottom left. Either way, give that button a click and in the search field that pops up, type ‘form’.

Once you’ve dragged and dropped the form widget into place, you’ll see a basic form on the page complete with fields for a name, email, and message, plus a submit button. It should look something like the form below. Pretty simple so far, right?
Customising the Form Actions
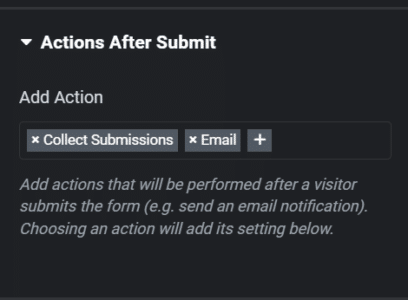
Right now, our form is like a car without an engine. It looks good, but it’s not going anywhere. We need to give it some instructions – who should receive the information? Where should it go? But don’t worry, Elementor has got our back. It makes this process super easy, and the best part? No coding required! We’re going to focus on two sections in the left panel to get things moving: ‘actions after submit’ and ’email’.

Let’s make sure we’ve got both ‘Collect Submissions’ and ‘Email’ listed under Actions After Submit. Think of ‘Collect Submissions’ as your safety net. Even if an email notification slips through the cracks, you can rest easy knowing that every submission is tucked away safely on WordPress. The ‘Email’ section is like your personal assistant, giving you a nudge whenever a new submission comes in.
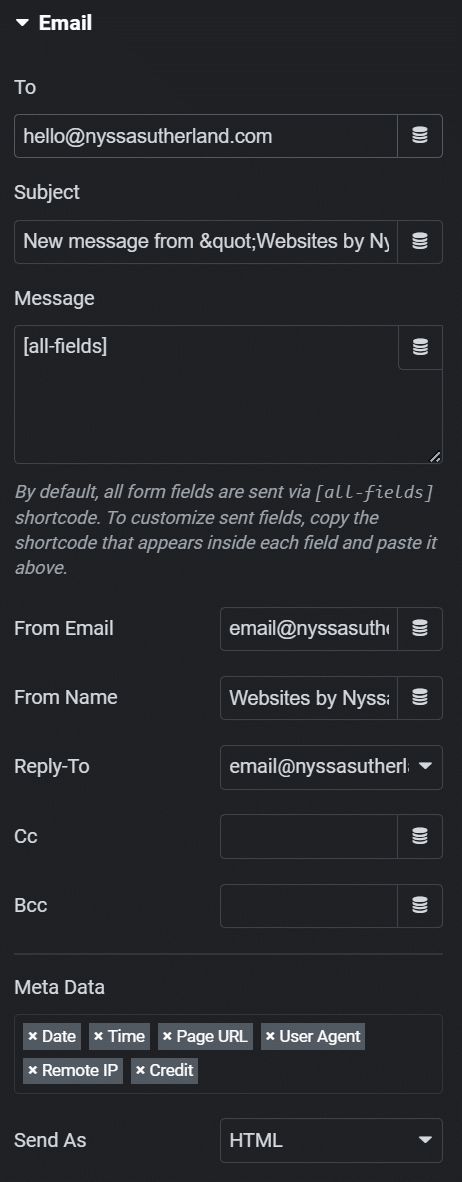
Now, let’s peek at the ‘Email’ section. By default, the ‘To’ address is set to the admin email for your WordPress website. If you want the form submissions to land in a different inbox, you’ll need to change that. Don’t forget to tweak the subject line too, so you can spot form submissions at a glance in your inbox.
By default, all the fields from your form are included in the email message. It’s like getting the whole scoop in one go. But here’s a word of caution: from a security standpoint, this might not be the best route. Including sensitive information in an email can be risky, as emails can potentially be intercepted. So, it’s a good idea to only include the information you absolutely need in the email, and check the rest directly in your WordPress dashboard.

Now that we’ve set up the basics, let’s dive a little deeper into the other fields you’ll see in the email section. Each of these fields serves a specific purpose:
From Email: This is the email address that will appear as the sender of the email. It’s a good idea to use an email address associated with your website’s domain to avoid spam filters.
From Name: This is the name that will appear as the sender of the email. You might want to use your business name or your own name here.
Reply-To: This is the email address that will be used when the recipient hits the ‘reply’ button on their email client. It’s usually the same as the ‘From Email’, but it could be different if you want replies to go to a different inbox.
CC: Stands for ‘Carbon Copy’. Any email addresses you put here will receive a copy of the email. Use this if you want someone else to be aware of the form submissions, but they don’t need to take action.
BCC: Stands for ‘Blind Carbon Copy’. It works like CC, but the email addresses you put here won’t be visible to other recipients. This is useful if you want to keep the email addresses private.
Metadata: This includes additional information about the form submission, like the date and time it was submitted, the user’s IP address, and the page URL where the form was submitted. This can be useful for tracking and analysis, but remember to respect user privacy and comply with any relevant laws and regulations.
And voila! You’ve just created a fully functional form for your website. Isn’t it amazing what you can do with a bit of guidance and a dash of creativity? But don’t stop here. Elementor is packed with styling options that can transform your form from functional to fabulous. So go ahead, play around with the design, make it truly yours.
If you’re hungry for more knowledge or need a helping hand, don’t hesitate to reach out. Whether you want to learn more about Elementor’s capabilities or need a quote for a custom, stylish form, I’m here to help. After all, creating beautiful and effective websites is what I do best. Happy form building!

 BY NYSSA.


